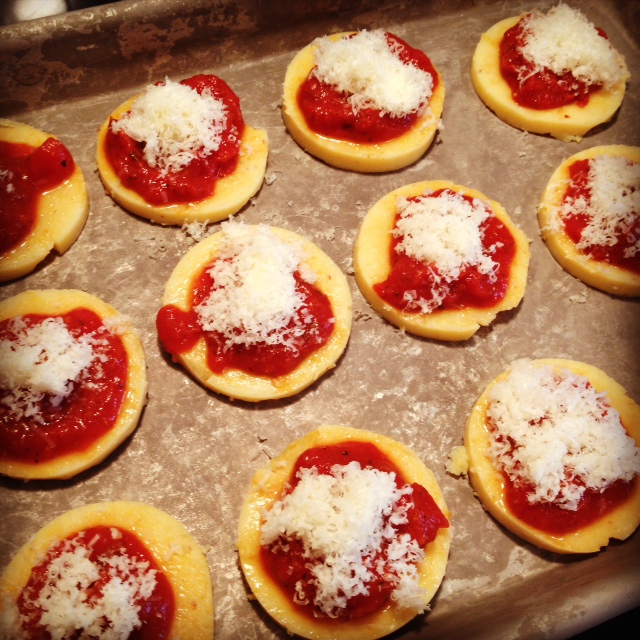
Grab My Button

Mama’s Blissful Bites
May 2013
M T W T F S S
« Apr    
 12345
6789101112
13141516171819
20212223242526
2728293031  

SITS

Bloggy Moms

Influential Social Media Mom Blog Community

Enter your email address to subscribe to this blog and receive notifications of new posts by email.

Snacks

Chocolate Banana Peanut Butter Kabobs #Cleaneating

I was craving and I do mean craving some sweet chocolate. Whenever I get in those moods, I make sure to give myself a sweet treat! I usually make these as bites and use toothpicks but I didn’t have any so this is how the chocolate banana peanut butter dessert kabob was created! (Say that ten times fast!) Sometimes a girl has to do what a girl has to do!

Chocolate Banana Peanut Butter Kabobs #Cleaneating

Chocolate Banana Peanut Butter Kabobs #Cleaneating

Ingredients

  • 2 bananas: sliced
  • 2-3 Tbs peanut butter* (See Note)
  • 70% bakers chocolate
  • *lollipop sticks or toothpicks

Instructions

  1. Place parchment paper on a baking sheet
  2. Slice bananas and place on baking sheet
  3. Top with peanut butter and freeze for 30 minutes
  4. Take lollipop sticks and push three on a stick
  5. Melt chocolate in a glass container in the microwave
  6. Spoon over kabob and place in a paper cup
  7. Place in freezer for 20 minutes
Schema/Recipe SEO Data Markup by ZipList Recipe Plugin
http://www.mamasblissfulbites.com/2013/05/14/chocolate-banana-peanut-butter-kabobs-cleaneating/

Note: I used homemade peanut butter. To make, I used 2 cups roasted peanuts in a food processor and processed for 5 – 7 minutes until it turned into peanut butter. I still have lots left. Placed in glass container in fridge.

If you don’t have lollipop sticks use toothpicks and place one on each stick for a bite size snack.

007

This is how they look prior to having chocolate drizzle all over them. You don’t have to freeze them for thirty minutes. To be honest, they thaw very quickly. I like to freeze them to have the peanut butter and banana adhere to each other better but it’s really no biggy. Skip that step if you want ;) You will be very satisfied either way with this sweet, delicious treat!


Baked Beet Chips #Cleaneating

On my facebook page, I decided to announce my new name. I am unofficially, officially calling myself the snack queen. I am completely 100% satisfied with this, officially. I feel I can accomplish making healthy breakfasts, lunches and dinners but I’m constantly looking for healthy snack options. I don’t want snacks in a box! (Remember, they are processed and who knows what’s really in them? Eeek!) Since summer is on its way, it’s easier to find fresh fruits and veggies, also making snack options easier. On a regular basis, we eat honey walnut apple sandwiches and raw banana pecan-raisin bites, (which are kid approved according to my four and two year old!) and really easy and quick to make.  I’ve tried all kinds of chips as well, potato, sweet potato, apple and to add to my fun snack list, baked beet chips.

Why beets?

  • Beets are low in calories with zero trans fat and zero saturated fat!
  • Great energy source! They are high in carbohydrates
  • They are inexpensive
  • Used as an aphrodisiac – love that, right?
  • Helps purify the blood and prevent some cancers such as colon
  • Filled with vitamins, iron, magnesium

Baked Beet Chips #Cleaneating

Baked Beet Chips #Cleaneating

Ingredients

  • 3 beets: peeled and sliced (I used a mandolin)
  • 1 tsp olive oil
  • sea salt

Instructions

  1. Preheat oven to 350 degrees
  2. Prepare two baking pans (metal by itself or stoneware with parchment paper)
  3. After peeling and slicing beets, place in a bowl
  4. Add olive oil and combine
  5. Place on baking sheet and add a touch of sea salt
  6. Bake for twenty minutes
  7. Rotate both baking sheets
  8. Bake another twenty minutes until dried out
Schema/Recipe SEO Data Markup by ZipList Recipe Plugin
http://www.mamasblissfulbites.com/2013/05/11/baked-beet-chips-cleaneating/

Mama’s Thoughts:

I made these on a regular baking sheet and a stoneware bar pan with parchment paper. My test was to see which made the best beet chip. I was looking for a chip that was nicely crunchy on the ends and dried out in the middle without being over burnt. I had one very large beet and two small beets. I placed the large beet on the baking sheet so it cooked evenly. You want them closely to the same size and thickness for even cooking.  My other stoneware pan had parchment paper and two smaller beets. My findings: The metal baking sheet by its self made chips that were flat. No curling edges at all. The problem, I burnt them. I know, can you believe I make kitchen mistakes too? Although they were my thickest and largest beet, they dried out the fastest. The stoneware pan needed just a few minutes longer to bake. The edges curled up real nice and made them look like an authentic chip. It was easier for me to control the baking in the stoneware. The baking sheet pan turned to black real fast and I didn’t catch it in time :( If you are carefully keeping an eye on your metal baking sheet, I think you could have real nice chips that are flat, crunchy and delicious, BUT if you are like me and running around doing a million things, use your stoneware pan!

I did enjoy eating the beet chips. They were yummy and a bit on the “oily” side like a regular potato chip. I have to admit, my house had a delicious scent too.

Please note, I am not a physician/doctor or have any type of medical background. I do have the knowledge of lots of research, dedication and commitment to deliver you with the most current facts that I can find. Please see a physician before switching to any dietary plan. I am simply a mother striving to make my family (and yours) healthier one step at a time.


#CleanEating Date and Pecan Granola

This is by far my favorite granola, period. Period. Period. I love the combination of sweet dates and pecans. It’s a symphony of packed flavors begging to be devoured. Yup, I love it that much. Granola is perfect for the morning or a mid-day snack. I prefer my granola and dates over a bowl of yogurt topped with blueberries but placed in a bowl with almond milk is always a sure winner as well. In the afternoon, I pick at it as a delicious, nutritional snack. Let’s just say this Clean Eating, Date and Pecan Granola is the way to go!

Pecans are amazing by themselves or in a granola. Actually, they are my favorite nut. (Perhaps there’s a reason why this is my favorite granola, no?) They are a good source of energy and contain nutrients, minerals, antioxidants for a good, clear mind. Research has shown that eating a hand full of pecans daily has improved the mind and also lowers LDL “bad cholesterol” and increase HDL or “good cholesterol.”

This recipe includes 2Tbs of peanut butter. Be sure to use Clean Eating peanut butter. I used homemade peanut butter with coconut oil. (You can get the recipe by clicking, here.) Ultimately, you can make your own homemade peanut butter by using just peanuts in a food processor but I like mine with a hint of coconut oil. It adds some pizazz of flavor.

#CleanEating Date and Pecan Granola

#CleanEating Date and Pecan Granola

Ingredients

  • 3 cups rolled oats (not instant!!!)
  • 1/2 cup pecans: chopped
  • 1/2 tsp salt
  • 1 tsp cinnamon
  • 1/2 cup maple syrup
  • 2 tbs peanut butter (I made my own homemade PB with coconut oil)
  • 1/2 cup dates: in tiny bite sized pieces

Instructions

  1. Preheat the oven to 300 degrees
  2. Place parchment paper on a baking sheet (I used stoneware)
  3. Combine the first 4 ingredients in a bowl
  4. In a small bowl, combine maple syrup and peanut butter
  5. Pour syrup bowl into oats bowl and stir to combine
  6. Place on baking sheet and bake for 20 minutes
  7. After twenty minutes, take out and stir
  8. Add dates and bake for 20 more minutes
  9. Let cool and serve
Schema/Recipe SEO Data Markup by ZipList Recipe Plugin
http://www.mamasblissfulbites.com/2013/05/09/cleaneating-date-and-pecan-granola/

Mama’s Thoughts:

I have to admit, I was so happy with my recipe that I packed up some granola in little mason jars and delivered them to family members. Yup, it was that good. If you want to add any additional fruit to this, I would do it at the end and stir it in.

PS If you need a Mother’s Day spa get-a-way, be sure to check back tomorrow for a special surprise!

Please note, I am not a physician/doctor or have any type of medical background. I do have the knowledge of lots of research, dedication and commitment to deliver you with the most current facts that I can find. Please see a physician before switching to any dietary plan. I am simply a mother striving to make my family (and yours) healthier one step at a time.

Homemade Peanut Butter with Coconut Oil

Let’s be honest, peanut butter is plain out yummy and very versatile. You can add it to your fruit, vegetables, stir-fry, morning rice bowl, smoothies, ice cream, bread and whatever else your heart desires. Then there’s the texture. Are you a crunchy or creamy kid? Do you mix your peanut butter with chocolate? How about different kinds of nuts? Or do you just dip your finger in the container and go to town? Hey, who am I to judge?

Why should you kick out the grocery store jar of peanut butter?

For starters, homemade peanut butter taste AMAZINGLY better. But secondly, there’s a questionable ingredient in those jars. Have you ever read the ingredients before? To make peanut butter, you only need roasted peanuts. Easy right? Roast them in the oven and bake, place in a food processor and your done. It’s that simple. But to stay in our stores and on the shelves, the famous companies include something called mono and diglycerides. Never skip over anything you don’t understand.

Here’s the 411: Mono and diglycerides are food additives used to combine ingredients that don’t normally combine. If you purchase a natural peanut butter, you will notice that you have to stir it to combine the oils. When it sits in the fridge, the oil rises to the top. It’s because your natural peanut does not contain mono and diglycerides. There are also no-stir natural peanut butters that will include an oil that can be a semi-solid as well as a liquid at different temperatures such as palm and coconut oil. Why are mono and diglycerides bad? For starters, in 2006 the United States Food and Drug Administration started requiring all manufacturing companies to list the foods’ trans fat on the label. This included lipids and triglycerides but not mono and diglycerides! This means they could be trans fat and we have yet to know! Studies have not been calculated on the potential harm of this additive or on our health either. Do you want to take a questionable additive? I sure don’t!  Plus, homemade peanut butter taste MUCH BETTER and is super simple!

Homemade Peanut Butter with Coconut Oil

Homemade Peanut Butter with Coconut Oil

Ingredients

  • 16 oz peanuts (I choose lightly salted dry roasted peanuts, choose whatever kind you want. Just make sure they are roasted)
  • 1 tbs coconut oil
  • 1 teaspoon honey (optional)

Instructions

  1. Place all ingredients in a food processor.
  2. Turn it on :)
  3. It should take between 5-10 minutes but it will get there and make your very own peanut butter
Schema/Recipe SEO Data Markup by ZipList Recipe Plugin
http://www.mamasblissfulbites.com/2013/04/30/homemade-peanut-butter-with-coconut-oil/

The peanuts will go through many stages in the food processor. It will look like crumbles, then form a big ball and finally fall apart in ooey gooeiness. Just be patient. I prefer to use the food processor over the blender because I don’t like cleaning out the blades and big container help make clean up easier.

I also put my peanut butter in the fridge. I have been told that if you use no oil or a semi-solid oil, that it doesn’t have to be refrigerated. I must admit, I have never tested the waters out on this. I just place it in the fridge. After a day, the peanut butter becomes more of a solid but still very smooth and easy to spread. Be aware that coconut oil has a very distinct flavor. You can taste a pinch of it in the recipe. If you like less, make it with less. It’s entirely up to you!

If you want crunch peanut butter, save some peanuts and process until smooth. Pulse them in the last few minutes.

Once you have homemade peanut butter, it’s very unlikely that you’ll go back to the processed IDK what’s in the jar. Yup, it’s that delicious. I place mine in mason jars with a bow and give out as gifts to my family. You know, the just because I want you to have peanut butter jars :) Always great to have in your back hand! Be sure to make different flavors too. Play around and have fun!

Roasted Cauliflower Bites

I could not wait to get my hands on one big, yummy cauliflower! My family dislikes cauliflower (sigh) I truly I wish I could say they loved it as much as I do, but that would be a lie. So I made my favorite, Roasted Cauliflower Bites! It’s late in the week and I normally go shopping on Sunday’s, which also means we are low on food options. Well, this isn’t entirely true. I’m the shopper, organizer and meal planner so I know what’s available, if it doesn’t come in a box the rest of the family feels as if they are lost. I have been secretly plotting against my family, they have no clue it’s coming, none.  Slowly, I have been eliminating the boxed snacks from our cabinets. Slow is key. Sometimes I wonder if my husband notices, but then again, I think he is catching on. I’d like to say that we are a processed-free house but it isn’t so. I call it a work in progress, wink wink. I think he may be on to something when he asks to go shopping with me…oh yes, he loves to shop with me.

So Lately, we have been shopping all together. I have my prepared list and give him part of it. With one child in his hands and one in mine, we are off shopping and we “race” to the finish. I give him a small list, maybe five or six items, for a few reasons: 1. It’s a big store, I don’t want him to get lost 2. I try to keep him focused 3. I want to get out too! What I have noticed is that we now take two carts, which means we go home with even more food. If we stuck to the list, we would be probably stick to the budget, unfortunately we end up spending an additional $50-75 in food! What could be the cause? His cart is full of boxed snacks. (Yes, I’m slapping my forehead!) Sometimes it’s hard when the paths are not meeting!

Back to my cauliflower. We are low on snack foods and I felt the 3pm snack wave hit me hard. We usually eat dinner between 4:30-5pm so I started to prepare my plan, I mean meal early. Roasting cauliflower is quite easy, the difficult level is very low and the outcome is quite delicious. The trick is not to soak your cauliflower with oil. If you use too much oil it gets soggy. Think popcorn oozing with butter and only the taste of butter, no crunch or texture. You don’t want that right? I used 1 teaspoon and to be honest, I feel like I should have used less. You can also spice up this recipe with red pepper flakes, garlic powder, garlic salt, cinnamon, Parmesan cheese, really any spices you have! Be creative and let it go! I enjoy a simple salt so I can taste the beauty of just the cauliflower. You’re looking for a slight brown in color, perhaps a little darker if you like a crunch. After fifteen minutes, I stirred those babies up. There’s nothing worst than burnt cauliflower, yuck!

Roasted Cauliflower Bites

Roasted Cauliflower Bites

Ingredients

  • 1 Cauliflower
  • 1 tsp olive oil
  • salt

Instructions

  1. Preheat the oven to 425 degrees
  2. Prepare a baking sheet with parchment paper
  3. Cut the "trees" off the cauliflower and place in a bowl
  4. Add oil and salt
  5. Toss to combine
  6. Pour on baking sheet
  7. Bake for 20-25 minutes
Schema/Recipe SEO Data Markup by ZipList Recipe Plugin
http://www.mamasblissfulbites.com/2013/04/13/roasted-cauliflower-bites/

So by now you may be a little confused of all my jibberish and honestly I don’t blame you, let’s put the pieces together. My body was craving cauliflower, maybe for its good source of Vitamin C or the amazing Vitamin B(s) that I always seem to lack, either way, I wanted it badly. To say the least, I was very satisfied, my family not so much. Experts say to try a new food at least ten times, so this is try number one. For some reason I thought the white colored foods were more appealing to children but they have some how rejected my mashed potatoes and now my cauliflower…sigh. My goal is by the end of this summer, to have my children and my husband eating more wholesome foods and less processed foods. This is our secret and my challenge. Do you have an eating challenge in your family? Please share! For now, I’ll just keep purchasing more cauliflower and sneaking it in their foods. :)

Blessings,

Mama

Healthy Banana Split

Being a Mama, I’m always looking for fast, healthy recipes that are easy to create! I prefer to stay away from boxed items as much as possible (the list of why is too long to go into!) so I’m left with the real deal, you know real foods. It’s more of the different ways to prepare food than anything else. My Banana Bites almost have the same ingredients as my Healthy Banana Split but different textures and preparation is what really makes this snack come to life. Instead of placing toppings on banana slices, I sliced it more like a banana split – giving it a whole new style of taste and enjoyment! Foods don’t have to be “boring” but exciting and fun! By changing up how the banana is prepared, this snack becomes a dessert. My little ones want to enjoy a variety of foods and this is one way of how I keep them interested. There’s so much more than grabbing some nuts from a bag, or slicing an apple – whole foods can be FUN! Sometimes you just need to use your imagination and get creative. ;)

Ingredients:

  • 1-2 tbs almond butter
  • raisins
  • pecans: chopped
  • drizzle of agave or honey
  • chocolate: shavings for garnish

This snack is a sweet treat and can definitely be served as dessert! But I like it for a mid-afternoon snack personally :)

Healthy Banana Split Cover

Step 1: Split your banana in half lengthwise

Step 2: Add nut butter, followed by all your favorite toppings!

Step 3: Drizzle agave on top and finish off with chocolate shavings!

Think of how much better this is than a regular ice cream sundae. No ice cream for one and instead replaced with all goodness!

Healthy Banana SPlit

Go ahead and feel good about treating yourself! It’s always awesome to divert the cravings and still achieve the sweet taste you’re looking for. Try it, you will be happy that you did!


Honey Walnut Apple Sandwiches

Sometimes I feel like pleasing a three and two year old is far more challenging than pleasing someone in the public eye. You know like someone big – maybe Oprah or the President or even Ellen or maybe easier than pleasing Chef Ramsay (lol or maybe not!) My point is that usually even if someone dislikes a dish, they go through the courtesy of still eating it and pretending they enjoyed it! Or possibly not saying anything at all and politely feeding it to the dog while the host isn’t looking. But preschoolers are a challenge! They will tell you how it is and refuse to eat whatever looks “foreign” on their plates! The same old song and dance came up on the plate – apples. Now to a person who loves eating fruits and vegetables, I will take them as they are, but to my little ones, they looked at the cut apples and declined.

Welcome jazzed-up apples. If you are familiar with my banana pecan-raisin bites, you will know that I like to dress up my fruit and give it a little pa-jazz to the plate. This dish is no different and the flavors blend perfectly. I mean magical music time.

Honey Walnut Apple Cover

Ingredients:

  • one apple: any kind
  • almond butter or any kind of nut butter
  • 2 teaspoon walnuts: finely chopped
  • drizzle of honey (or you can subsitute agave)

Step 1: Core the apple.

Step 2: Slice the apple making sure to have even amounts of apple disks!

Step 3: Spread your favorite nut butter (on all or one side of the apples)

Step 4: Combine two sides to make a sandwich

Step 5: Sprinkle with walnuts and drizzle honey on top.

Honey Walnut Apple Sandwiches

I made them each an apple and they both handed me the plates back asking for more. I have to be honest, I didn’t mind, I wanted another one myself! This snack is a sure winner and will stay in our house. No more regular apples only dressed up ones. From a “mom’s point-of-view” you would have thought I won the lottery. Nothing thrills me more than to see my children eat healthy! Wahoo!!

Do you have challenges feeding your children healthy snacks? What kind of snacks do you feed them? I think we need to have a parent 101 intervention and start collaborating healthy snack ideas! Please feel free to share some of your “winning” snacks!


Raw Banana Pecan-Raisin Bites

It’s Monday and I can finally breathe, well almost! This weekend, I accomplished a successful Healthy SnackFEST class, where we discussed the “big wig” companies, played a fun question game with healthy food prizes (because you are…”The apple of my eye,” get it)  and ate delicious raw and whole food snacks! Just to fill you in, I am working hard at writing a cookbook, the snacks are my test foods! It has been quite a fun, adventurous foodie weekend! People came from different backgrounds and knowledge about the food industry and it was a blast to discuss many things!

One lady pulled me aside and said that snacks need to be quick for her since she works 40+ hours a week. She is also tired of the same old carrot and celery but doesn’t know how to jazz things up. This recipe is for her.

You can really dress up any fruit or vegetable with any toppings. I like to picture my fruit like an ice cream sundae. Yes, I really did just compare fruit to ice cream. There are so many toppings to choose from! Take a banana for example. A banana is amazing, you can pour goey chocolate on top with nuts, you can slice it in half and put toppings in the middle like a sandwich, you can even add it on top of your ice cream! It’s sweet and delicious. Cherries, berries, nuts, whipped cream all taste yummy! This simple recipe is healthy too! Just goes to show you that snacking can be simple and healthy!

Ingredients:

  • 1 banana
  • 2 tbs pecans, chopped
  • 1 tbs raisins
  • shredded coconut

Step 1: Slice banana in bite size pieces

Step 2: Add pecans, raisins and coconut.

Banana Pecan Raisin Bites 2

Make sure that your bananas are right. When I mean right, I mean ripe. If they aren’t ripe, it takes away from the sweetness factor. If this is the case, I just throw on some maple syrup. It’s a great combo!

Banana Pecan Raisin Bites

Be sure to make plenty! Out of no where, these hungry monsters start to appear and run with plates! I actually made a plate for my husband and my children beat me to it. So I made two more plates.

This recipe is great because you can put the raisins, coconut and pecans in a bag and take a banana with you. When you get to work or school (wherever) slice up the banana and throw on the toppings from the bag! Saves lots of time and its an easy way to jazz up your banana! The end result is pure healthy and deliciousness.


Roasted Maple-Cinnamon Peanuts

I’m really, really, really excited about this weekend! I am hosting a “Healthy Snack” show! This means, I’m showing a variety of healthy snacks that are made from whole and raw foods! My guests will have a full demonstration of how to recreate these snacks, as well as taste test, play games and then go home with their own mini-cookbook! Did I mention I’m excited? Because I really am!

I have been hard at work in the kitchen, two to three times a day, creating new recipes, tasting and testing. This recipe was a “crowd-pleaser” at my last party so I wanted to include it at my show. I mean really…who doesn’t like a salty/sweet nuts? You don’t? Are you nuts?!?! Just kidding!!!

To me, snacks shouldn’t take a long time to put together and they should be waiting on the side lines for me to pick up and eat at my leisurely pleasure! I want them to be healthy and whole, tasty and satisfying so I’m not running into the kitchen for another snack! Peanuts are great because not only do they provide a wonderful source of protein but they also keep the belly feeling full! This is a great snack to keep handy for those desperate times of hunger or when you just need an extra something something. I keep a bag handy for my kids. When I start to see they are turning from a cute kid to a scary hungry monster, I throw them a few, literally :)

Ingredients:

  • 2 cups party peanuts (mine were lightly salted)
  • 1/4 cup 100% maple syrup
  • sea salt
  • 1/2 teaspoon cinnamon

Step 1: Pre-heat the oven to 350 degrees. Prepare a baking sheet with parchment paper. Spray with cooking oil. (I used the Large Bar Pan from The Pampered Chef)

Step 2: In a small glass bowl, mix syrup with cinnamon and microwave for thirty seconds. (I used the 1-cup prep bowls, again, by The Pampered Chef)

Step 3: Place peanuts in a mixing bowl and add the syrup mix. Stir well to combine.

Step 4: Pour on parchment paper and bake for five minutes. Toss the peanuts and bake 5 more minutes. Keep your eye on it, but they should be done between 12-15 minutes.

Step 5: When you pull them out, stir them up again. If you let them sit, the sauce will thicken and they will all stick together. Cool and eat!

If you live in the Baltimore area, email me and I can let you know the details on the next show! I would love to meet you and believe me, this recipe is just the beginning!

Happy Healthy eating!


Raisin Almond Granola

Growing up, we never ate granola, ever. Cereals were filled with sugar and I could always find something fluffy and kid-friendly floating in the mounds of milk. Then I grew up and things became foreign all over again. I realized there were not only granola cereals but granola bars and some packets at 100 calories or less so I wanted to explore this granola world.

One thing to know, granola is fabulous and I do mean fabulous. There are so many ways to use it! First, let’s talk about making it. You will never go and purchase a granola box again after you make it from scratch. Ever. Why would you? It’s like buying a pre-made apple pie wrapped in plastic wrap that’s been sitting on a shelf in a store versus a decadent mouth-watering scrumptious apple pie baking in your oven. Which would you prefer? Exactly – the one I didnt’ have to bake. (ha! ha! JUST PLAYING!)

It’s easy-peasy. Throw in a few ingredients, mix, bake, eat and enjoy. I know you can do it. Then once you do it, you will make all different kind of variations that you like. No excluding those shreds of coconut or pieces of chocolate (who can resist chocolate?) Make it according to the things you LOVE so you will fall in LOVE with eating HEALTHY GRANOLA!

Shew, not sure where all of that came from. But you love me and I love you – so hey, it’s all good, right?

Not sure what you can do with granola? Keep reading.

Ingredients:

  • 1/3 cup coconut oil
  • 1/4 cup maple syrup (you know, the real kind!)
  • 1/8 cup honey (vegan? Awesome – switch it for Agave syrup, bada bing bada boom!)
  • 2 cups rolled oats (not instant folks…switch up the box!)
  • 1/2 cup organic shredded coconut (I personally love Let’s Do…Organic, USDA approved)
  • 1/4 cup organic raisins
  • 3/4 cup almonds: sliced (I like to see big chunks when I’m eating but you can chop them as well)
  • 1/2 cup sunflower seeds
  • 1/4 cup flaxseed
  • 1 teaspoon cinnamon (I used The Pampered Chef pantry line called Cinnamon Plus Spice Blend. It contains nutmeg, allspice, ground orange peel, cloves and ginger. Highly recommend. If you don’t have it, no worries. Substitute it for cinnamon!)

Step 1: Preheat oven to 270 degrees

Step 2: Prepare an 11×13 baking sheet with parchment paper. (I always use stoneware so you may need to adjust time accordingly)

Step 3: In a medium sauce pan over low heat, combine the first three ingredients. (Coconut oil, honey and maple syrup). Stir to combine and warm for about five minutes.

Step 4: Meanwhile, in a larger bowl, combine the remaining ingredients.

Step 5: Pour stove mixture to the oat bowl and stir well to combine.

Step 6: Spread mixture evenly over prepared baking pan

Step 7: Bake for 60-70 minutes. Keep checking on it. The house should start to give a cinnamon aroma but if it turns to a burnt aroma, you know you’re baked! (hahahahahaha, get it?!)

Step 8: Allow to cool. Break up with a wooden spoon into smaller chunks.

Here are some really cool things to do with granola:

  1. Eat it as it is…as a snack
  2. Pour milk (I love vanilla almond milk) and have a bowl of cereal
  3. Place it on top of a baked apple….wowza!
  4. Mix it with yogurt for a great breakfast
  5. Enjoy on top of a salad

I like to keep mine in an air-tight container in my purse. When you have kids and a snack-attack arrises, I rather be prepared then have nothing at all!  Tell me, how do you like your granola?

PS I am linking this recipe up with Foodie Friends Friday. Check out other fantastic bloggers as well at http://www.foodiefriendsfriday.com